
【ワールドの作り方:準備編vol.2】 Vket Cloud SDKの導入


はじめに
vol.1に引き続き、今回もVket Cloudワールド制作の準備方法を解説していきます!前回はアカウント登録・ワールド情報の登録を行いました。
今回はいよいよUnity、Vket Cloud SDKを導入していきます。
STEP0.「Unity」のインストール
★既にUnityを所持・使用している方
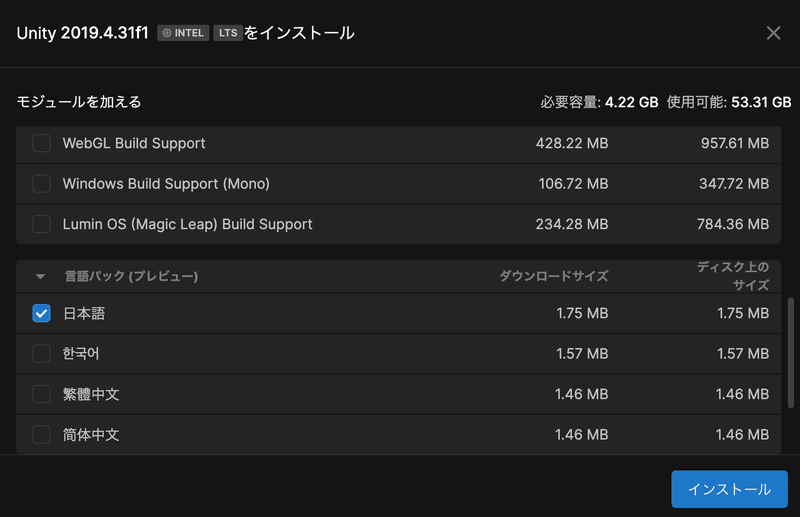
Vket Cloud SDK対応バージョンは現在「2019.4.31f1」と「2022.3.6f1」になります。ただし、Vket Cloud SDKのバージョンによって、対応バージョンは異なります。
Unity 2019.4.31f1 (SDK13.7.7以前)
Unity 2022.3.6f1 (SDK13.7.7以降)
SDK13.7.7では両方のバージョンをサポートしています。
該当バージョンをインストールし、プロジェクトを開き「STEP2」に進んでください。
①Unity Hubのダウンロード
まず、Unity Hubをダウンロードします(こちら)
ご自分の環境に合わせ、Windows用・Mac用のいずれかをクリックしてください。

➁Unity Hubのインストール
ダウンロードしたファイルを開き、手順に沿ってインストールを完了させてください。
次に対応バージョンの「Unity 2019.4.31」もしくは「Unity 2022.3.6f1」のHub Installation項目のInstallボタン(青色)を押し、ダウンロードしてください。(こちら)


もし表記を日本語にしたい場合は、「日本語」にチェックを入れて「インストール」を押します。
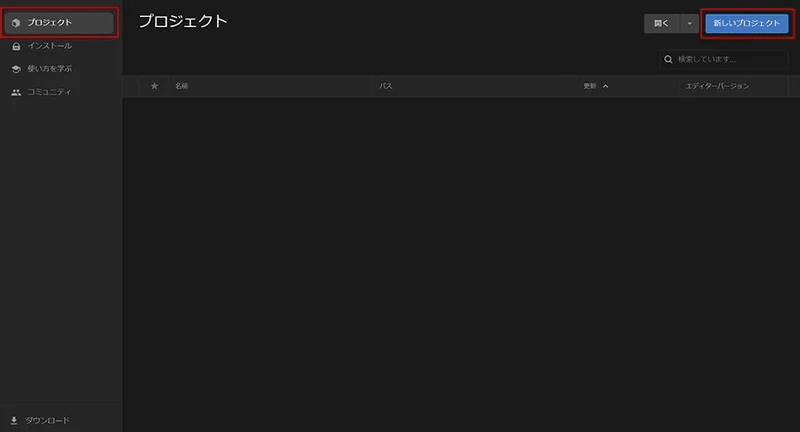
STEP1.Unityでプロジェクトを開く
続いてUnityでSDKが使えるようにプロジェクトを準備していきます。
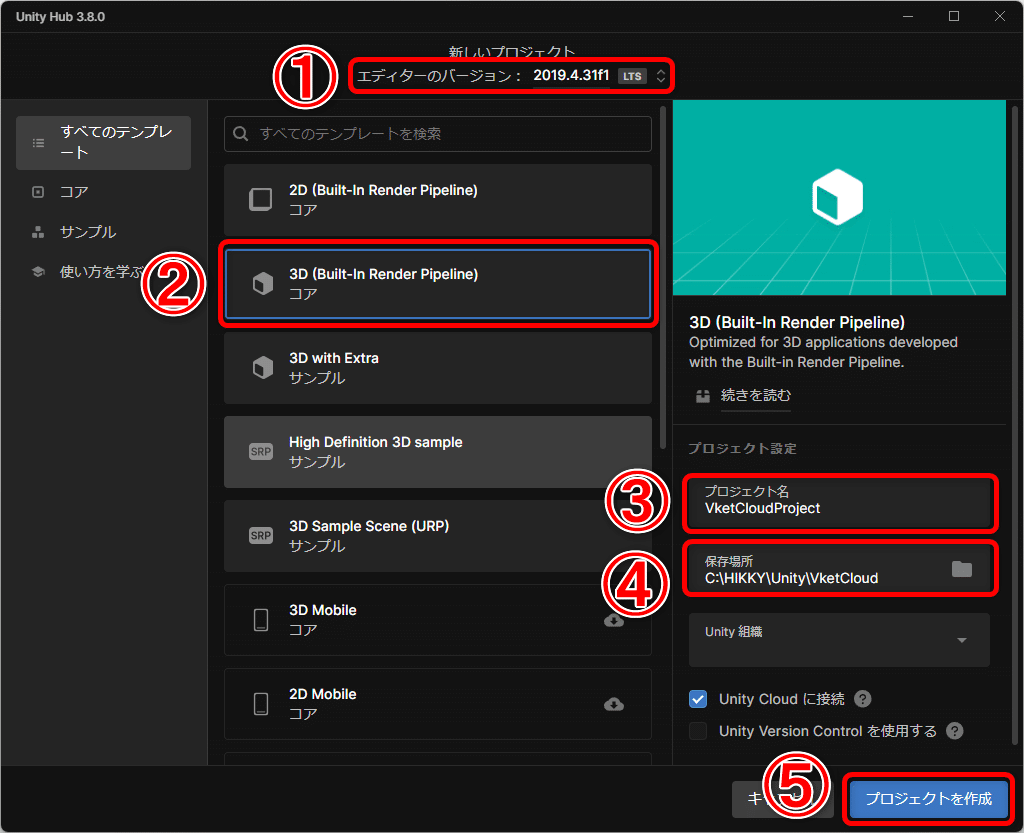
Unity Hubの「プロジェクト」から右上の「新しいプロジェクト」を開きます。
①バージョンは「Unity 2019.4.31f1」もしくは「Unity 2022.3.6f1」を選択してください。
②テンプレートは「3D」を選択してください。
③プロジェクト名を記入します。
※プロジェクト名にスペース(半角、全角含む)、
日本語を入れないでください。
OK例) 「MyProject」
NG例) 「My Project」「マイプロジェクト」「マイ プロジェクト」
④保存場所を指定します。
※途中のフォルダ名などにスペース(半角、全角含む)、
日本語を入れないでください。
OK例)「C:\User\Unity\VketCloud」「C:\VketCloud\」
NG例)「C:\太郎\Unity\VketCloud」「C:\Vket Cloud\」
⑤右下の「プロジェクトを作成」を押すと、Unityが立ち上がります。
※③及び④がうまく設定されていないと、のちのステップでVket Cloud SDKのログインがうまく動作しません。ご注意下さい。
※言語設定の変更
Unityは最初「英語表記」になっています。
本noteではUnityの編集画面は英語表記のまま掲載いたしますが、
日本語表記にしたい場合、手順は以下の通りです。
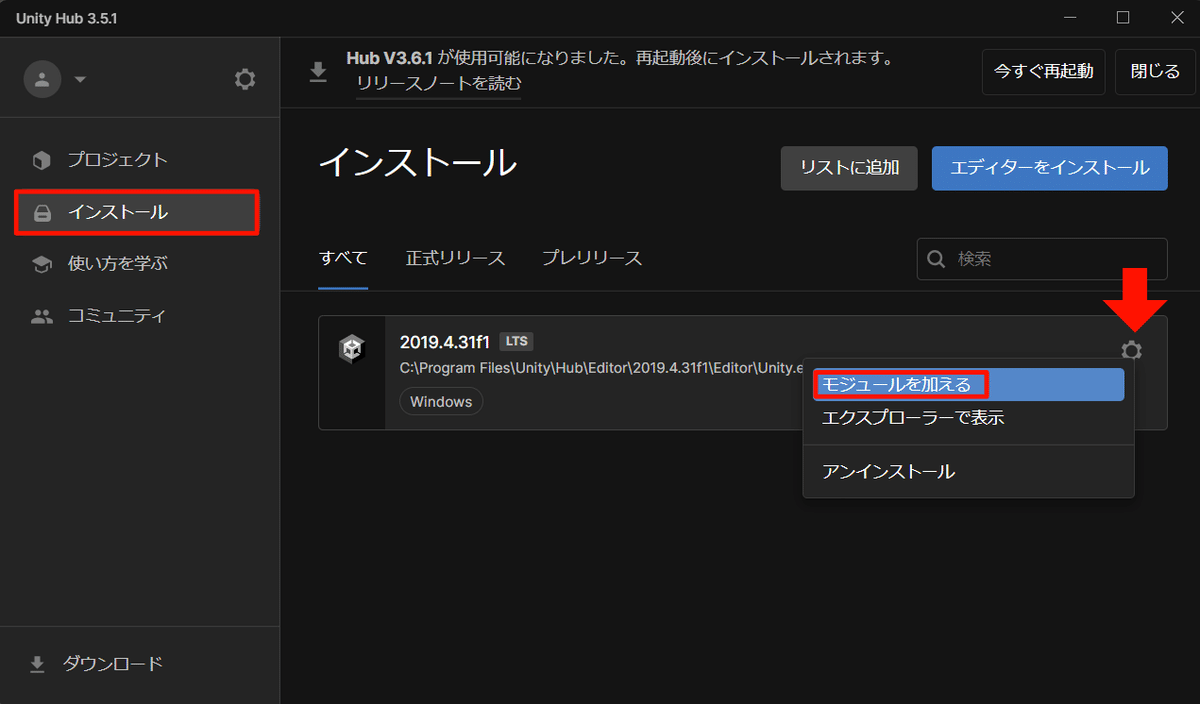
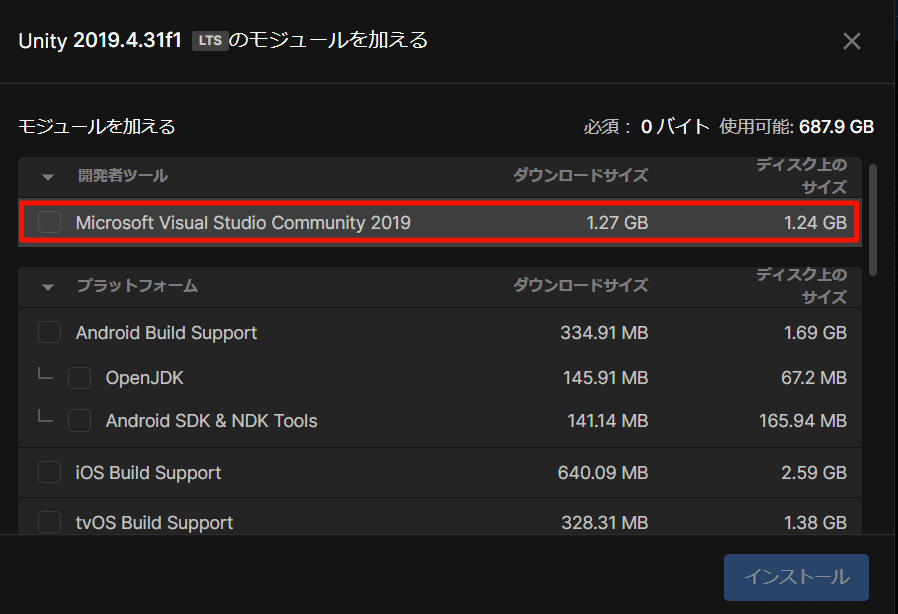
まずUnityを閉じ、Unity Hubにてインストールタブを選択し、バージョン名の右にある設定(歯車マーク)をクリックし、「モジュールを加える」をクリックします。
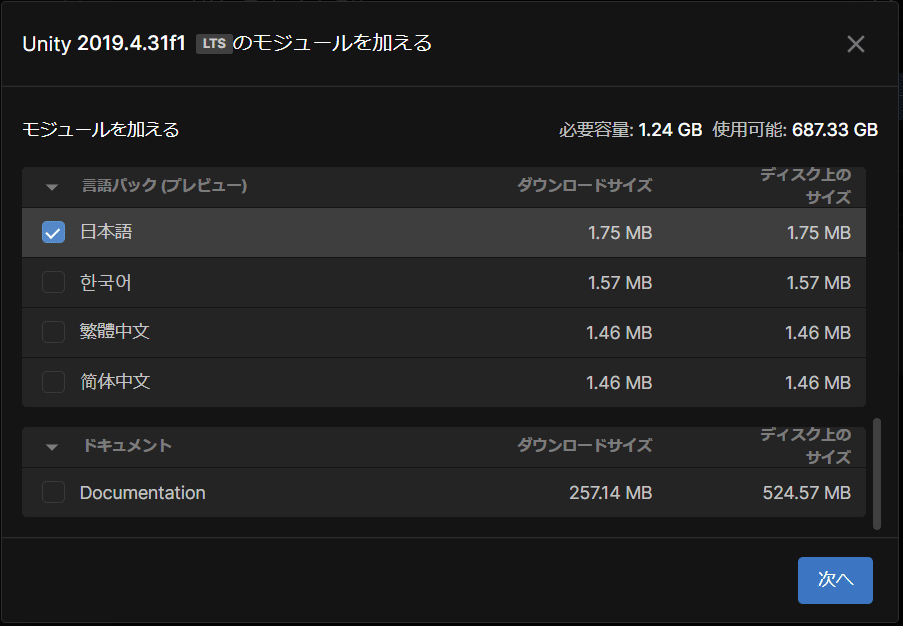
モジュール内の「言語パック」のタブを開き、「日本語」にチェックを入れ、右下の「次へ」をクリック。
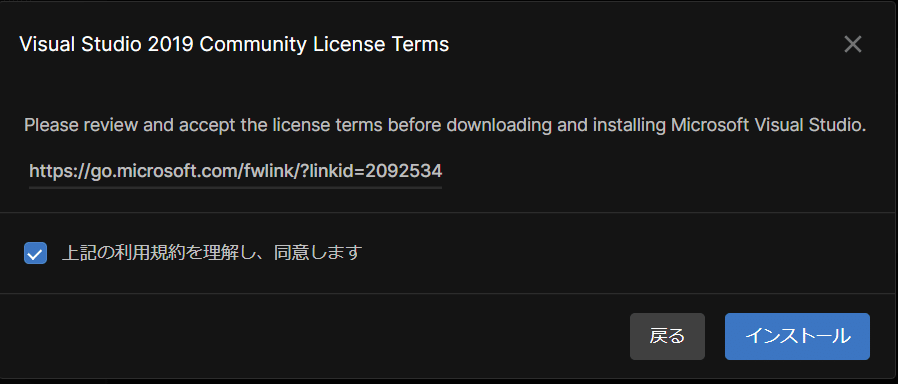
利用規約の同意にチェックを入れ、インストールをクリックしてください。
インストールが終わらない場合は、Unity Hubを再起動し、
開発者ツールの「Microsoft Visual Studio Community」のチェックを外してから再度インストールすると解決することがありますので、試してみてください。
インストールが完了した後、Unityを開きます。
メニューバーの「Edit」>「Preferences…」を押し、「Preferences」ウィンドウを開く
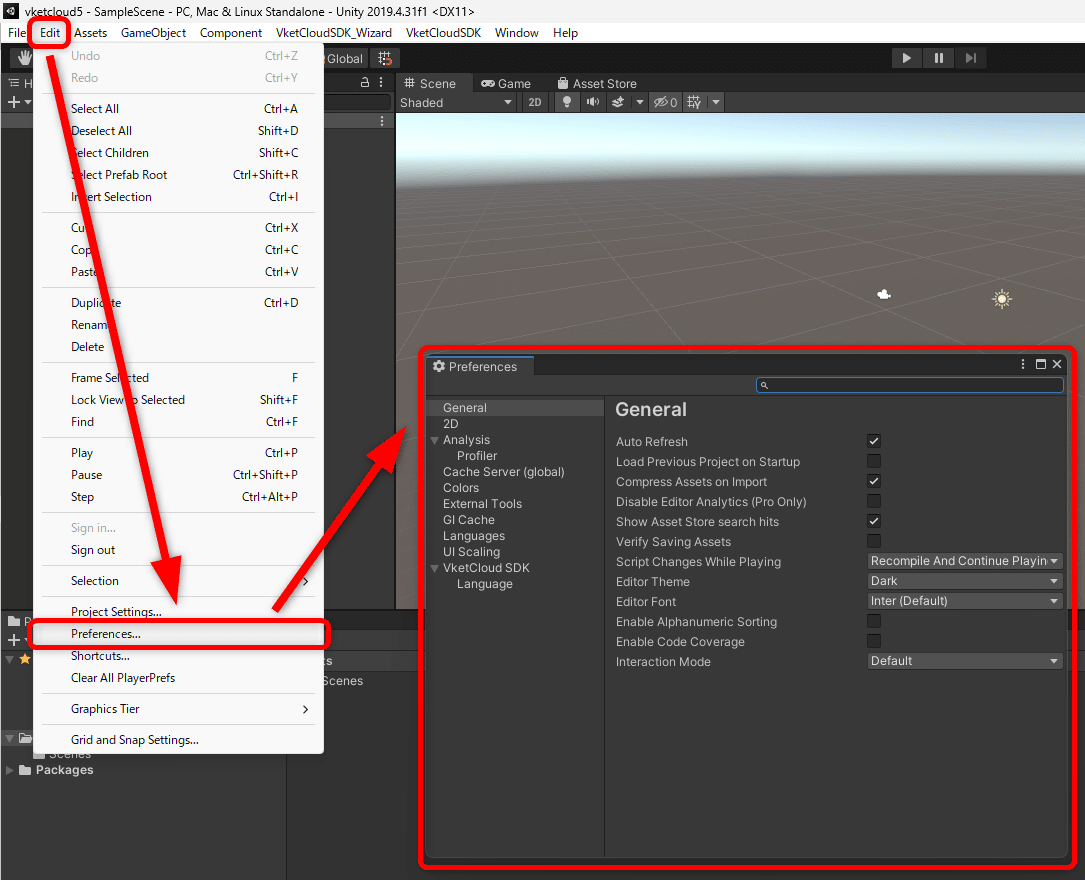
「Languages」の項目に移動し、「Editor language」を「日本語」に変更
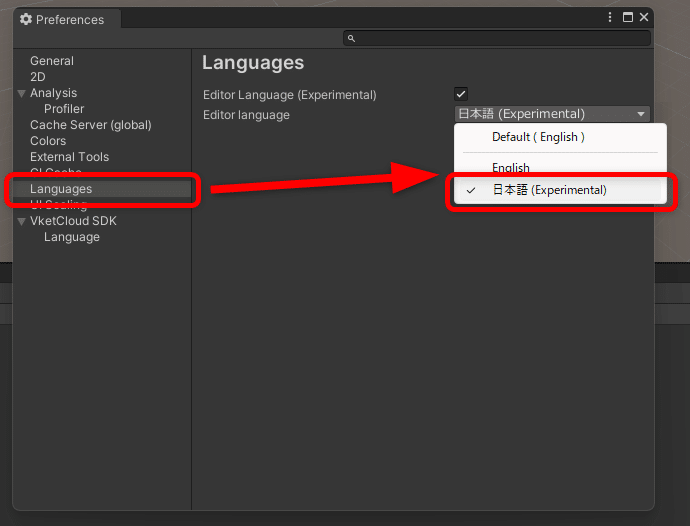
これでUnityが「日本語」で表示されます。
STEP2.Vket Cloud SDKの導入
Vket Cloud SDKとは、UnityでVket Cloudワールド制作を可能にするツールパッケージです。
まずはインストールウィザードというVket Cloud SDKのインストールやバージョン管理が簡単に行えるアセットをインストールし、そこからSDKを導入します。
またマニュアルを参照したい方はこちらから。
インストールウィザードの導入
①Unityのメニュー 「Edit」>「Project Settings… 」を選択し、「Project Settings」ウィンドウを開きます。
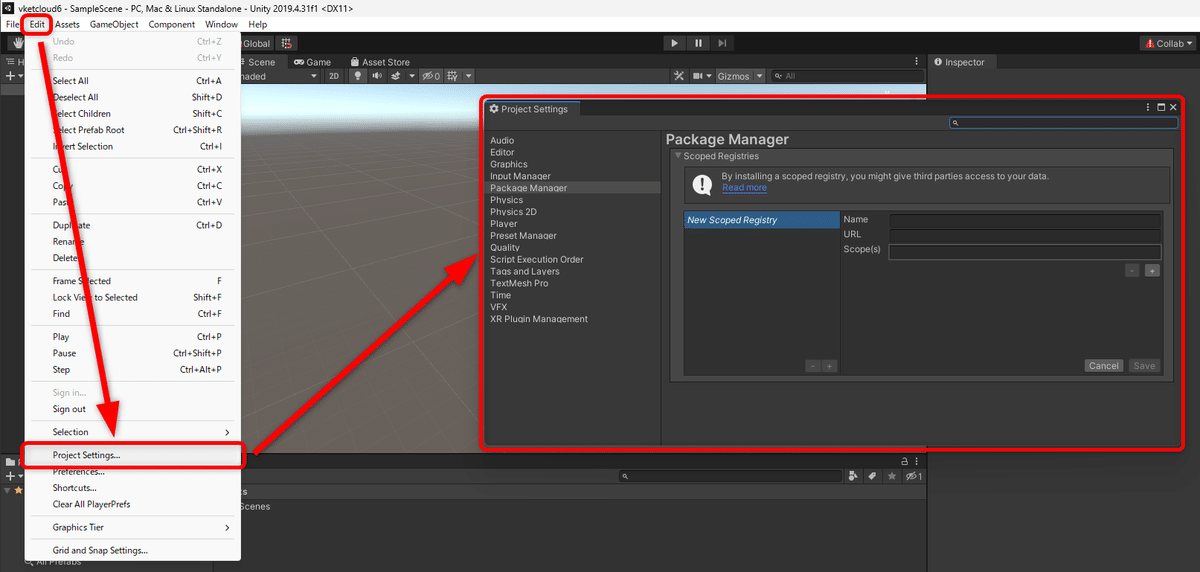
➁Project Settings内の項目から「Package Manager」を選択し、Vket Cloud SDKの各項目を以下のように記載します。
記入ミスがないよう、下の欄からコピー&ペーストで行うことをおススメします。
Name/
VketCloudSDK Install WizardURL/
https://registry.npmjs.comScope(s)/
com.hikky.vketcloudsdk-install-wizard
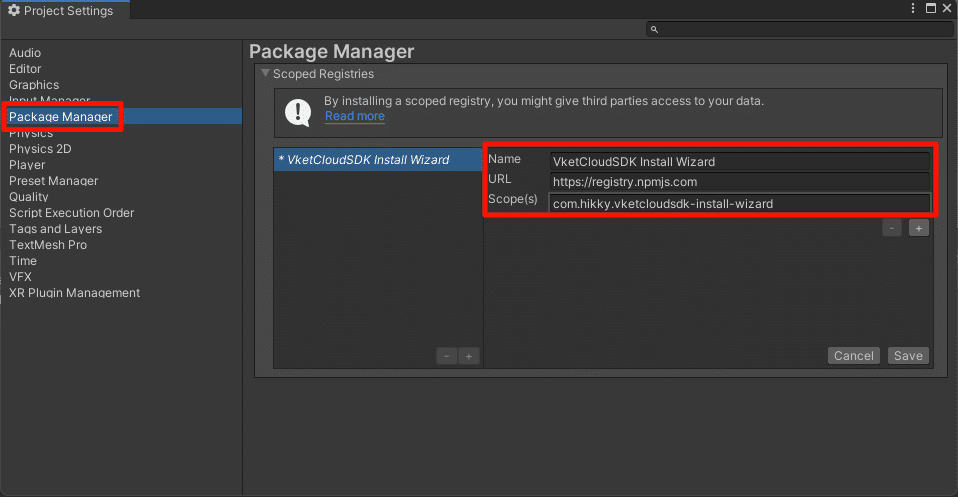
最後に右下の「Save」ボタンを押して設定内容を保存します。
③Unityのメニュー 「Window」 >「Package Manager」 から
「Packages」ウィンドウを開きます。
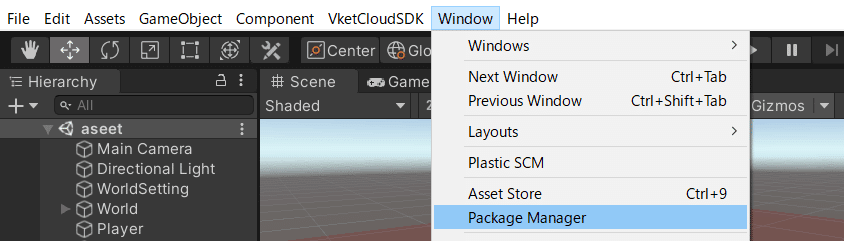
④ウィンドウ上部のドロップダウンより「My Registries」を選択します。
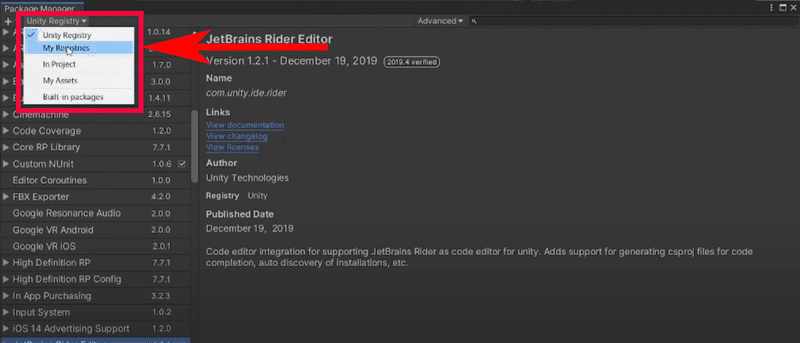
⑤VketCloud SDK Install Wizard を選択し、「Install」ボタンを押してインストールを開始しましょう。
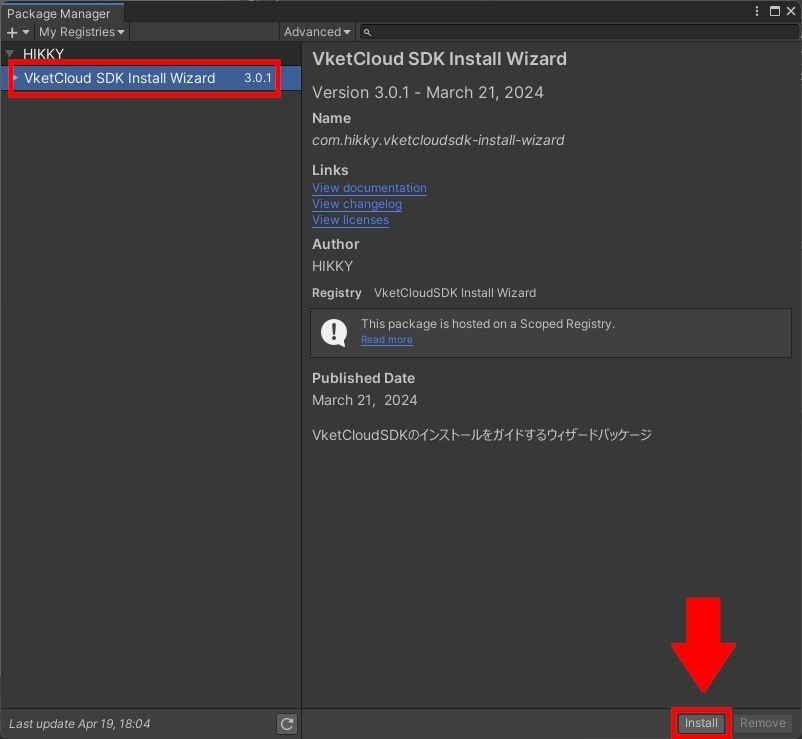
インストール後にこちらの画面が出てくればインストールウィザードの導入が完了になります。
この後右下の「Next/次へ」を押して、SDKのインストールに入ります。
SDKのインストール
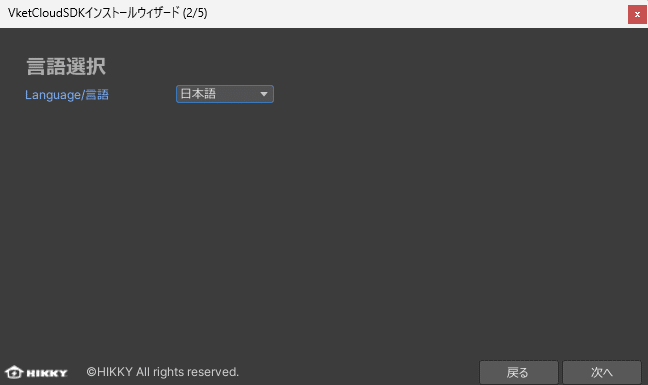
①まずはインストールウィザードの言語設定を選択します。
日本語がおすすめです。
選択し「次へ」を押します。
②必須設定の設定方法が表示されてきますので、
それに従って、設定を行っていきます。
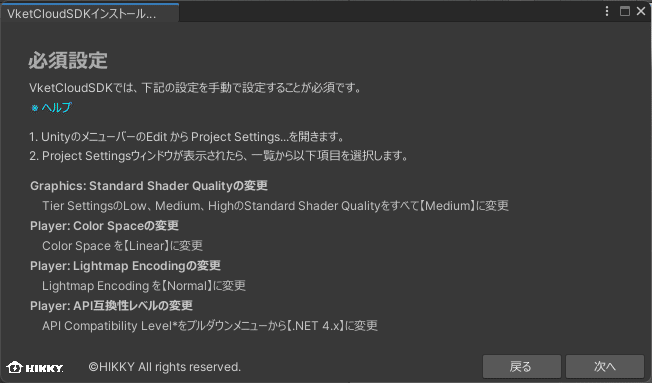
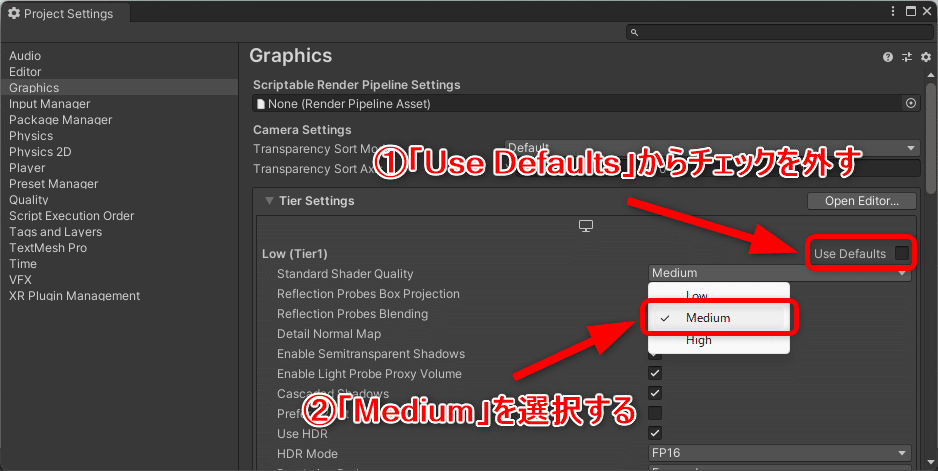
③まずはUnityのメニューバーのEditからProject Settingsをクリックしてください。次にProject Settingsウインドウが表示されたら、一覧からGraphicsをクリックします。
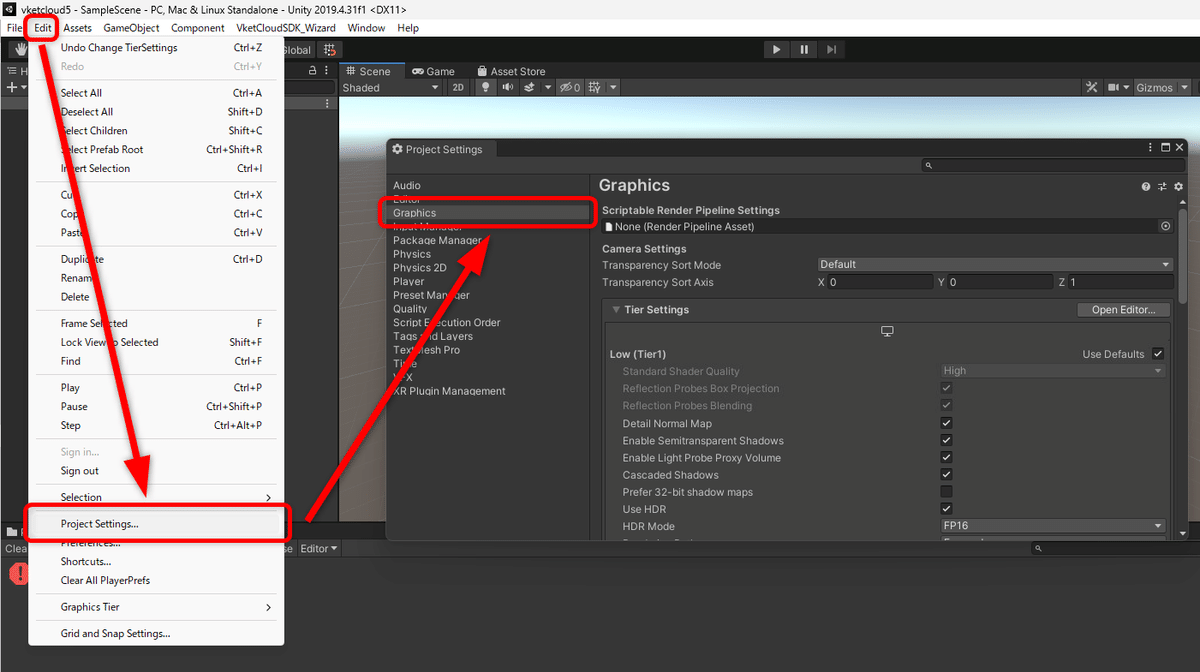
④Graphicsの設定画面の中で、「Tier Setting」の「Low (Tier 1)」の項目の中の「Use Defaults」のチェックを外し、「Standard Shader Quality」の項目を「Medium」 へと変更します。
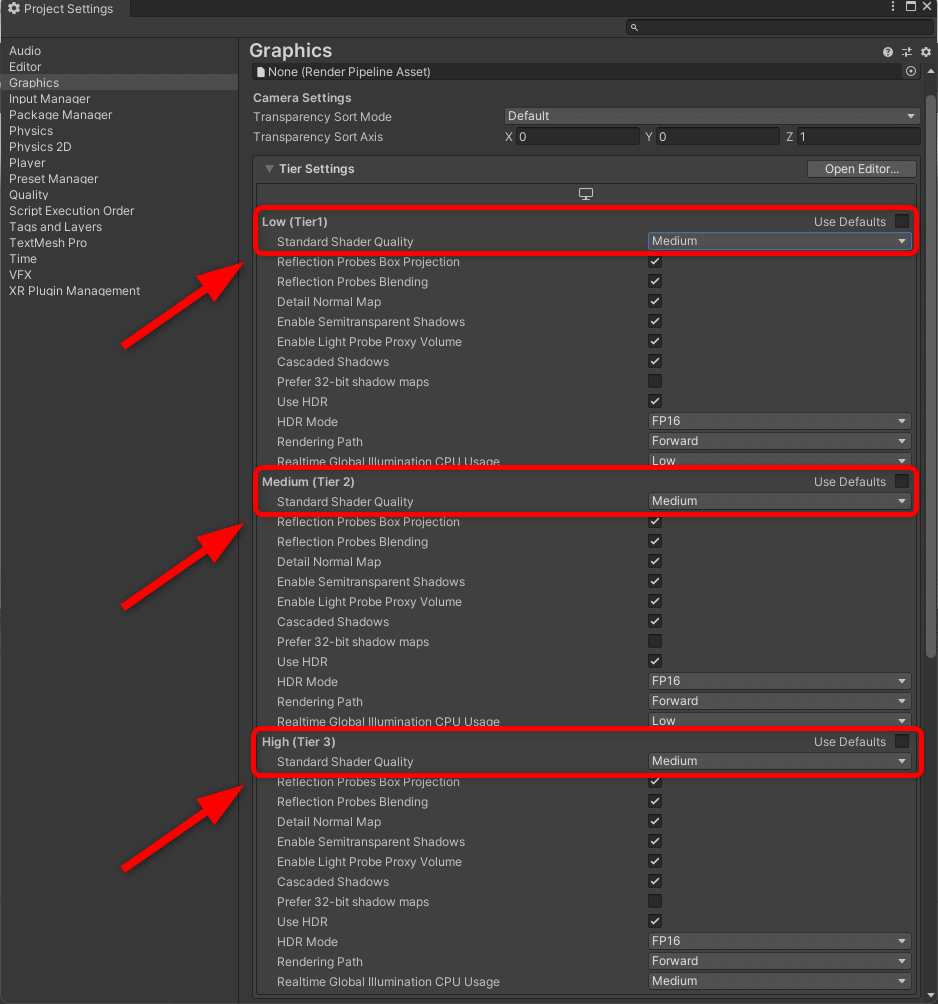
⑤これを「Low(Tier 1)」の下にある「Medium(Tier 2)」、「High(Tier 3)」の3つの項目とも行います。
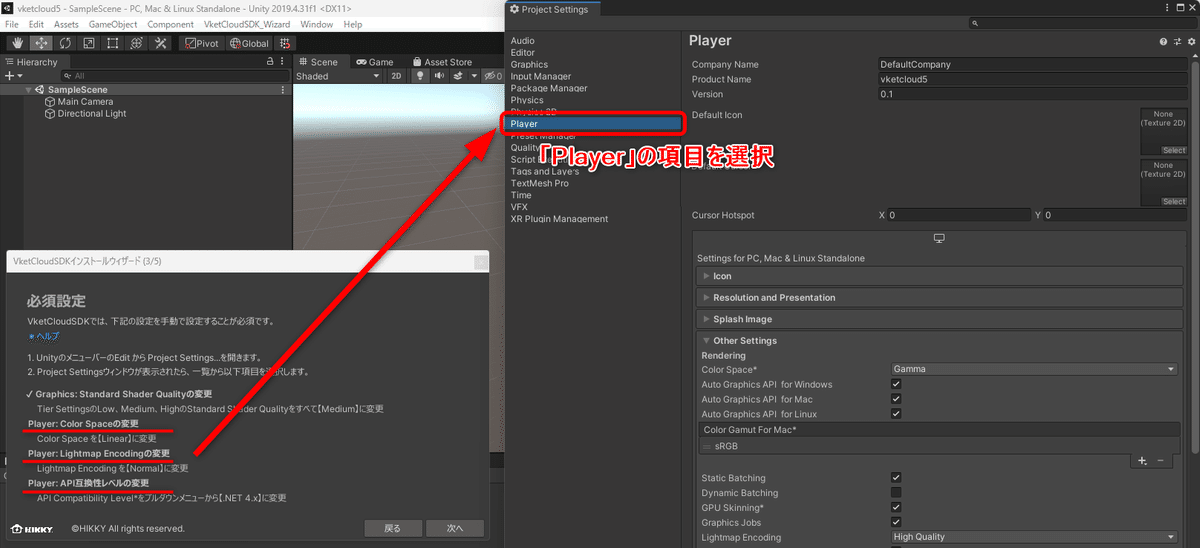
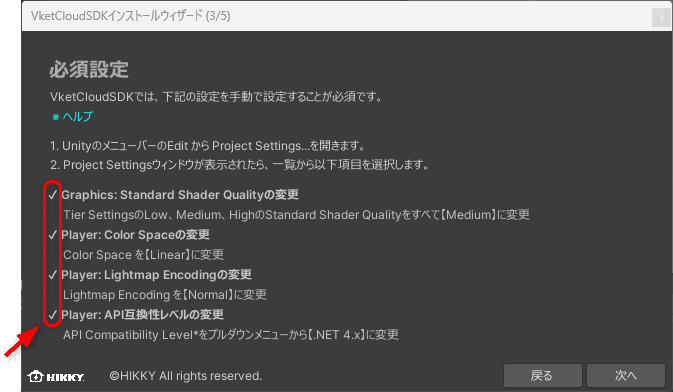
⑥その後、「Color Spaceの変更」「Lightmap Encodingの変更」「API互換性レベルの変更」を行います。
先ほど開いた「Project Settings」のウィンドウ内にある「Player」の項目を開いてください。
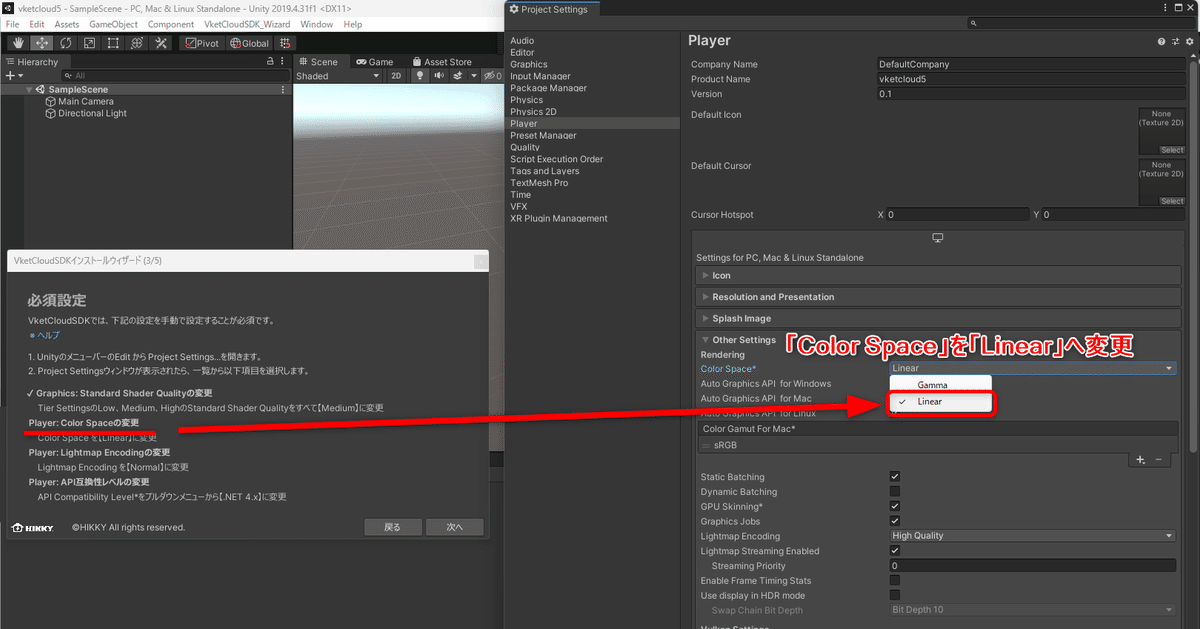
●Color Spaceの変更
「Player」の中の「Other Settings」の中にある「Color Space」の項目を探し、プルダウンメニューから「Linear」に変更してください。
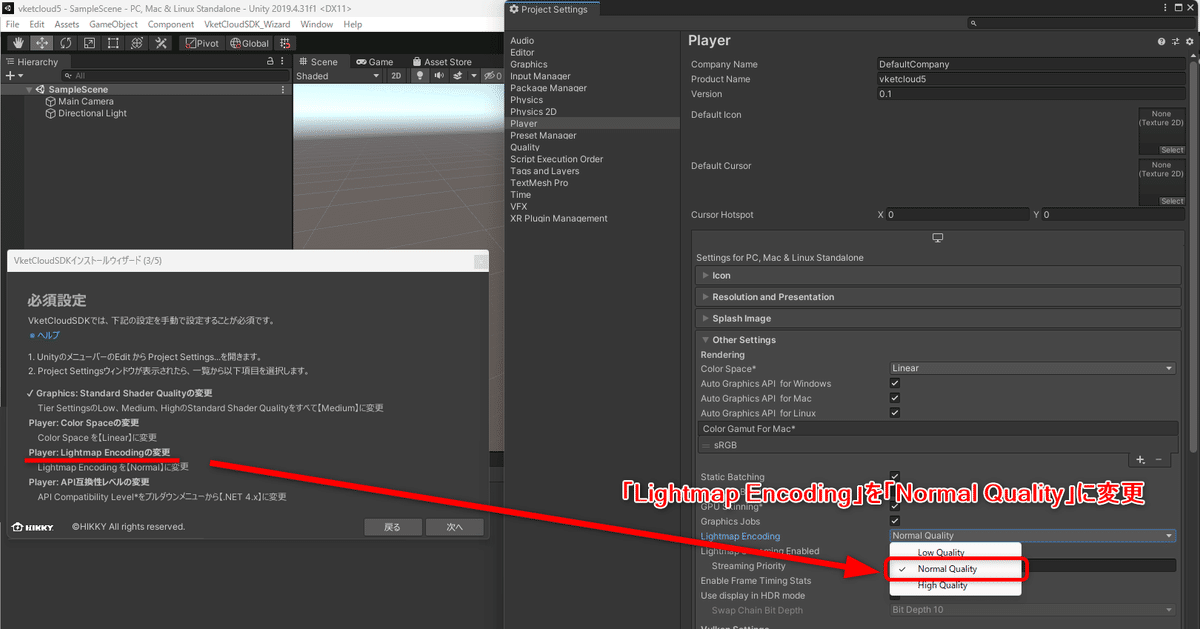
●Lightmap Encodingの変更
同じく「Other Settings」の中から、「Lightmap Encoding」の項目をプルダウンメニューから「Normal Quality」に変更してください。
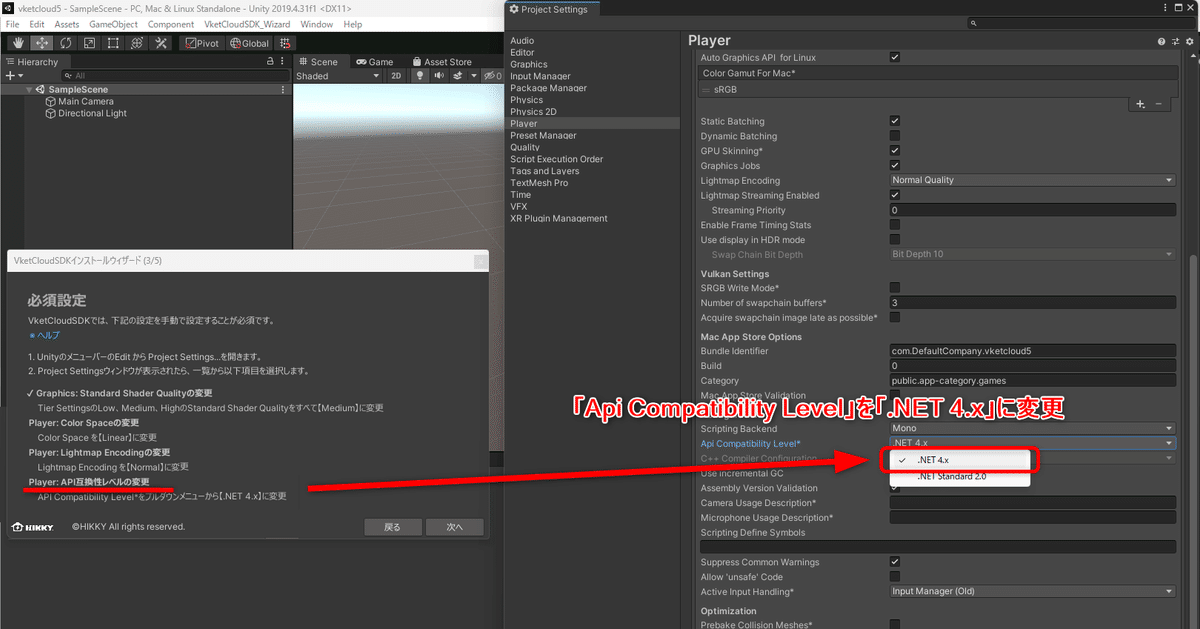
●API互換性レベルの変更(Unity 2019.4のみ)
同じく「Other Settings」にある、「Api Compatibility Level」の項目をプルダウンメニューから「.NET 4.x」に変更してください。
推奨設定の設定が終わると、インストールウィザードの一覧にチェックマークがつきます。すべて完了していることを確認し、右下の「次へ」を押してください。
⑦次にVket Cloud SDKのバージョン選択画面になります。
バージョンは長期サポートがある「安定版」、最新機能が多く含まれる「最新版」、または過去のバージョンを選べる「バージョンアーカイブ」から選ぶことができます。
※特に理由がなければ「安定版」をご使用ください。
なお、バージョンアーカイブ内のバージョンは、新規ワールド制作のための使用は非推奨です。
使いたいバージョンのチェックを付け、右下の「インストール」を押してください。

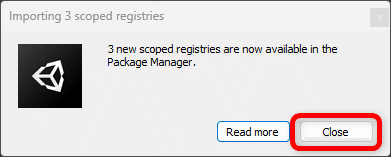
このようなウインドウが出る場合がありますが
「Close」で閉じて大丈夫です。
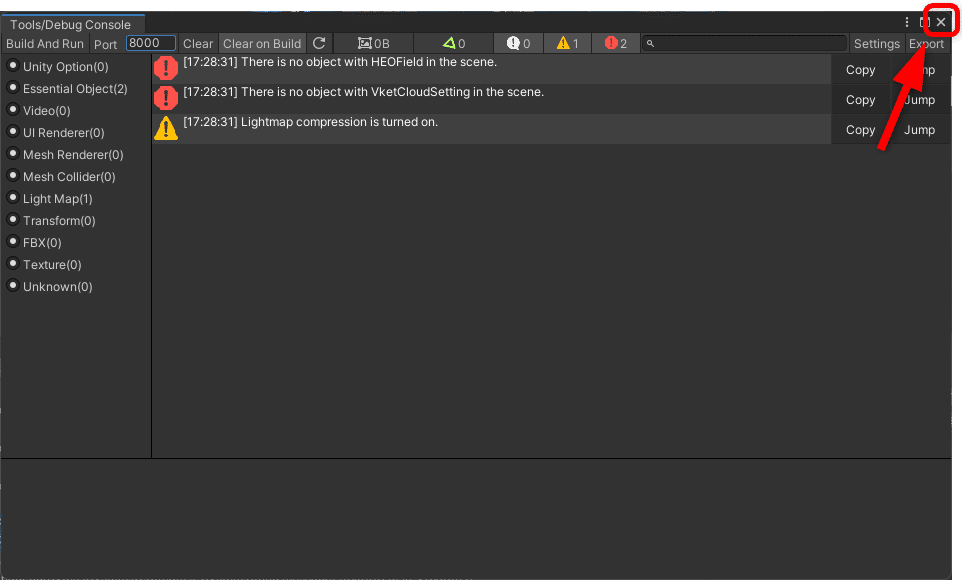
SDKのインストールが完了すると、初回のみデバッグコンソールが出現します。
これはVket Cloud SDKのワールド実装を行う際のデバッグや問題のトラブルシューティングを補助するためのツールです。
今回は使わないため閉じても大丈夫ですが、ワールドのビルドが失敗する・アップロードできない際の原因分析のために強力なツールであるため、利用をおすすめいたします。
デバッグコンソールの機能についての詳細はSDKマニュアルの「デバッグコンソールとは」 をご参照ください。
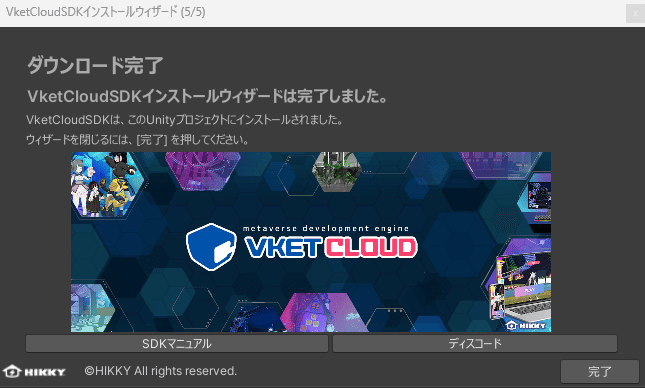
⑧インストールウィザードにダウンロード完了の画面が表示され、
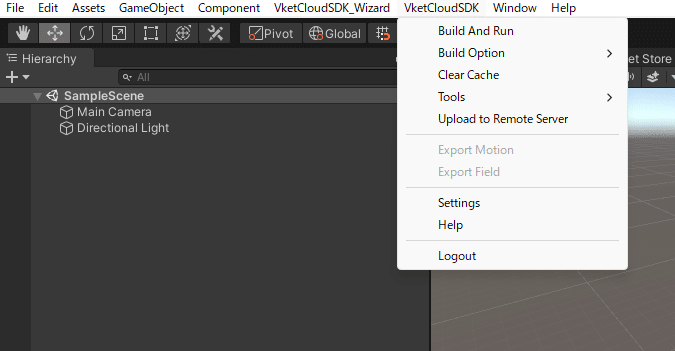
Unityのメニューに「Vket Cloud SDK」の項目が追加されていれば完了です。
※メニューで正常に表示されない場合はUnityを再起動させてください。

⑨「Vket Cloud SDK」の項目から、「Login」を押してください。
自動でブラウザが開きます。

ブラウザからVketアカウントにログインし、「Unityを開く」ボタンを押してください。

Unityが自動的に開かれ、「Login Success(ログイン成功)」のダイアログが出ればログイン完了です!
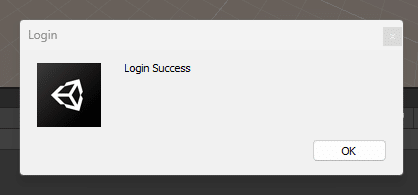
ログイン後、ワールドのビルド・アップロードが出来るようになります。
ここから
・どのようにワールドを作成するのか
・どのようにアップロードするのか
については次回の「ワールドの作り方初級編(全4回)」に進んでみましょう!お疲れ様でした!


この記事が参加している募集
